
6 Components lifecycle - Reference Documentation
Authors: Andrea Del Bene, Carsten Hufe, Christian Kroemer, Daniel Bartl
Version: 1.0.0.BUILD-SNAPSHOT
Table of Contents
6 Components lifecycle
Just like applets and servlets, also Wicket components follow a lifecycle during their existence. In this chapter we will analyze each stage of this cycle and we will learn how to make the most of the hook methods that are triggered when a component moves from one stage to another.6.1 Lifecycle stages of a component
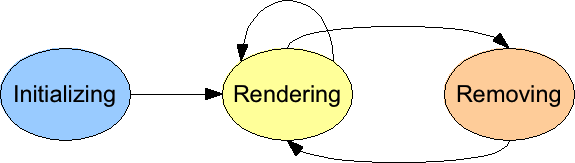
During its life a Wicket component goes through three basic stages:- Initialization: a component is instantiated by Wicket and prepared for the rendering phase.
- Rendering: in this stage Wicket generates component markup. If a component contains children (i.e. is a subclass of
MarkupContainer) it must first wait for them to be rendered before starting its own rendering. - Removing: this stage is triggered when a component is explicitly removed from its component hierarchy, i.e. when its parent invokes
remove(component)on it. This stage is facultative and is never triggered for pages.
 Once a component has been removed it can be added again to a container, but the initialization stage won't be executed again.
If you read the JavaDoc of class Component you will find a more detailed description of component lifecycle.
However this description introduces some advanced topics we didn't covered yet hence, to avoid confusion, in this chapter some details have been omitted and they will be covered later in the next chapters.For now you can consider just the simplified version of the lifecycle described above.
6.2 Hook methods for component lifecycle
ClassComponent comes with a number of hook methods that can be overridden in order to customize component behavior during its lifecycle.
In the following table these methods are grouped according to the stage in which they are invoked (and they are sorted by execution order):| Cycle stage | Involved methods |
|---|---|
| Initialization | onInitialize |
| Rendering | onConfigure, onBeforeRender, onRender, onComponentTag, onComponentTagBody, onAfterRenderChildren, onAfterRender |
| Removing | onRemove |
6.3 Initialization stage
This stage is performed at the beginning of the component lifecycle. During initialization, the component has already been inserted into its component hierarchy so we can safely access to its parent container or to its page with methodsgetParent() or getPage(). The only method triggered during this stage is onInitialize(). This method is a sort of “special” constructor where we can execute a custom initialization of our component.Since onInitialize is similar to a regular constructor, when we override this method we have to call super.onInitialize inside its body, usually as first instruction.
6.4 Rendering stage
This stage is triggered each time a component is rendered by Wicket, typically when its page is requested or when it is refreshed via AJAX.Method onConfigure
MethodonConfigure() has been introduced in order to provide a good point to manage the component states such as its visibility or enabled state. This method is called before the render phase starts. As stated in chapter 5.1, isVisible and isEnabled are called multiple times when a page or a component is rendered, so it's highly recommended not to directly override these method, but rather to use onConfigure to change component states. On the contrary method onBeforeRender (see the next paragraph) is not indicated for this task because it will not be invoked if component visibility is set to false.Method onBeforeRender
The most important hook method of this stage is probablyonBeforeRender(). This method is called before a component starts its rendering phase and it is our last chance to change its children hierarchy.If we want add/remove children components this is the right place to do it. In the next example (project LifeCycleStages) we will create a page which alternately displays two different labels, swapping between them each time it is rendered:public class HomePage extends WebPage { private Label firstLabel; private Label secondLabel; public HomePage(){ firstLabel = new Label("label", "First label"); secondLabel = new Label("label", "Second label"); add(firstLabel); add(new Link("reload"){ @Override public void onClick() { } }); } @Override protected void onBeforeRender() { if(contains(firstLabel, true)) replace(secondLabel); else replace(firstLabel); super.onBeforeRender(); } }
onBeforeRender() is quite trivial as it just checks which label among firstLabel and secondLabel is currently inserted into the component hierarchy and it replaces the inserted label with the other one.This method is also responsible for invoking children onBeforeRender() so if we decide to override it we have to call super.onBeforeRender(). However, unlike onInitialize(), the call to superclass method should be placed at the end of method's body in order to affect children's rendering with our custom code.Please note that in the example above we can trigger the rendering stage pressing F5 key or clicking on link “reload”.If we forget to call superclass version of methodsonInitialize()oronBeforeRender(), Wicket will throw anIllegalStateExceptionwith the following message:java.lang.IllegalStateException: org.apache.wicket.Component has not been properly initialized. Something in the hierarchy of <page class name> has not called super.onInitialize()/onBeforeRender() in the override of onInitialize()/ onBeforeRender() method
Method onComponentTag
MethodonComponentTag(ComponentTag) is called to process component tag, which can be freely manipulated through its argument of type org.apache.wicket.markup.ComponentTag. For example we can add/remove tag attributes with methods put(String key, String value) and remove(String key), or we can even decide to change the tag or rename it with method setName(String) (the following code is taken from project OnComponentTagExample):Markup code:<head> <meta charset="utf-8" /> <title></title> </head> <body> <h1 wicket:id="helloMessage"></h1> </body>
public class HomePage extends WebPage {
   public HomePage() {
      add(new Label("helloMessage", "Hello World"){
         @Override
         protected void onComponentTag(ComponentTag tag) {
            super.onComponentTag(tag);
            //Turn the h1 tag to a span
            tag.setName("span");
            //Add formatting style
            tag.put("style", "font-weight:bold");
         }
      });
    }
}
<head>
  <meta charset="utf-8" />
  <title></title>
</head>
<body>
  <span wicket:id="helloMessage" style="font-weight:bold">Hello World</span>
</body>
onInitialize, if we decide to override onComponentTag we must remember to call the same method of the super class because also this class may also customize the tag. Overriding onComponentTag is perfectly fine if we have to customize the tag of a specific component, but if we wanted to reuse the code across different components we should consider to use a behavior in place of this hook method.We have already seen in chapter 5.2 how to use behavior AttributeModifier to manipulate the tag's attribute. In chapter 16.1 we will see that base class Behavior offers also a callback method named onComponentTag(ComponentTag, Component) that can be used in place of the hook method onComponentTag(ComponentTag).Methods onComponentTagBody
MethodonComponentTagBody(MarkupStream, ComponentTag) is called to process the component tag's body. Just like onComponentTag it takes as input a ComponentTag parameter representing the component tag. In addition, we also find a MarkupStream parameter which represents the page markup stream that will be sent back to the client as response.onComponentTagBody can be used in combination with the Component's method replaceComponentTagBody to render a custom body under specific conditions. For example (taken from project OnComponentTagExample) we can display a brief description instead of the body if the label component is disabled:public class HomePage extends WebPage { public HomePage() { add(new Label("helloMessage", "Hello World"){ @Override protected void onComponentTagBody(MarkupStream markupStream, ComponentTag tag) { if(!isEnabled()) replaceComponentTagBody(markupStream, tag, "(the component is disabled)"); else super.onComponentTagBody(markupStream, tag); } }); } }
onComponentTagBody is invoked only when we want to preserve the standard rendering mechanism for the tag's body (in our example this happens when the component is enabled).
6.5 Removing stage
This stage is triggered when a component is removed from its component hierarchy. The only hook method for this phase isonRemove(). If our component still holds some resources needed during rendering phase, we can override this method to release them.Once a component has been removed we are free to add it again to the same container or to a different one.