21 Test Driven Development with Wicket and Spring - Reference Documentation
Authors: Andrea Del Bene, Carsten Hufe, Christian Kroemer, Daniel Bartl
Version: 1.0.0.BUILD-SNAPSHOT
Table of Contents
21 Test Driven Development with Wicket and Spring
Since the development of many web applications is mostly based on the Spring framework for dependency injection and application configuration in general, it's especially important to get these two frameworks running together smoothly not only when deployed on a running server instance itself but rather during the execution of JUnit based integration tests as well. Thanks to theWicketTester API provided by the Wicket framework itself, one can easily build high-quality web applications while practicing test driven development and providing a decent set of unit and integration tests to be executed with each build. As already mentioned previously, integration and configuration of our web applications is based on a lightweight Spring container meaning that the integration of Spring's ApplicationContext and a WicketTester API is essential to get our integration tests running. In order to explain how to achieve that integration in an easy and elegant fashion in your integration test environment, we'll first take a look at a configuration of these 2 framework beauties in a runtime environment.
21.1 Configuration of the runtime environment
In order to get the Wicket framework up to speed when your server is up and running, you usually configure aWicketFilter instance in your web application deployment descriptor file (web.xml) while passing it a single init parameter called applicationClassName that points to your main implementation class extending org.apache.wicket.protocol.http.WebApplication where all of your application-wide settings and initialization requirements are dealt with:<filter> <filter-name>wicketfilter</filter-name> <filter-class>org.apache.wicket.protocol.http.WicketFilter</filter-class> <init-param> <param-name>applicationClassName</param-name> <param-value>com.comsysto.webapp.MyWebApplication</param-value> </init-param> </filter>
<web-app>
    <filter>
        <filter-name>wicketfilter</filter-name>
        <filter-class>org.apache.wicket.protocol.http.WicketFilter</filter-class>
        <init-param>
            <param-name>applicationFactoryClassName</param-name>
            <param-value>org.apache.wicket.spring.SpringWebApplicationFactory</param-value>
        </init-param>
    </filter>
    <listener>
        <listener-class>org.springframework.web.context.ContextLoaderListener</listener-class>
    </listener>
    <context-param>
        <param-name>contextConfigLocation<param-name>
        <param-value>/WEB-INF/applicationContext.xml<param-value>
    </context-param>
</web-app>
org.apache.wicket.protocol.http.WebApplication. You can either define a suitable bean in the bean definition file itself:<beans> <bean id="myWebApp" class="com.comsysto.webapp.MyWebApplication"/> </beans>
@Component annotation accordingly while enabling the Spring container to scan the according package(s) of your application for relevant bean definitions:<beans> <context:component-scan base-package="com.comsysto.webapp" /> <context:component-scan base-package="com.comsysto.webapp.service" /> <context:component-scan base-package="com.comsysto.webapp.repository" /> </beans>
applicationFactoryClassName in the configuration of your WicketFilter will then be used in order to retrieve that very same WebApplication bean out of your Spring ApplicationContext. The Factory expects one and only one extension of Wicket's very own WebApplication type to be found within the ApplicationContext instance at runtime. If no such bean or more than one bean extending WebApplication is found in the given ApplicationContext an according IllegalStateException will be raised and initialization of your web application will fail:Map<?,?> beans = BeanFactoryUtils.beansOfTypeIncludingAncestors(ac,WebApplication.class, false, false); if (beans.size() == 0) { throw new IllegalStateException("bean of type [" + WebApplication.class.getName() + "] not found"); } if (beans.size() > 1) { throw new IllegalStateException("more than one bean of type [" + WebApplication.class.getName() + "] found, must have only one"); }
@Component
public class MyWebApplication extends WebApplication {
    @Override
    protected void init() {
        addComponentInstantiationListener(new SpringComponentInjector(this));
    }}
@SpringBean annotation.
21.2 Configuration of the JUnit based integration test environment
One of the main features of Apache Wicket framework is the ability to easily write and run plain unit tests for your Pages and all other kinds of Components that even include the verification of the rendering process itself by using JUnit framework and the WicketTester API only. When using Spring framework for application configuration together with Wicket, as we do, you can even use the same tools to easily write and run full blown integration tests for your web application as well. All you have to do is use Spring's TestContext framework additionally to configure and run your JUnit based integration tests. The Spring Framework provides a set of Spring specific annotations that you can use in your integration tests in conjunction with the TestContext framework itself in order to easily configure an according ApplicationContext instance for your tests as well as for appropriate transaction management before, during and after your test execution. Following code snippet represents a simple JUnit 4 based test case using Spring's specific annotations in order to initialize an ApplicationContext instance prior to executing the test itself:@RunWith(SpringJUnit4ClassRunner.class)
@ContextConfiguration(locations = {"classpath:WEB-INF/applicationContext.xml"})
@TransactionConfiguration(transactionManager = "txManager", defaultRollback = false)
public class LoginPageTest { private WicketTester tester; @Autowired
private ApplicationContext ctx; @Autowired
private MyWebApplication myWebApplication; @Before
public void setUp() {
tester = new WicketTester(myWebApplication);
} @Test
@Transactional
@Rollback(true)
public void testRenderMyPage() {
tester.startPage(LoginPage.class);
tester.assertRenderedPage(LoginPage.class);
tester.assertComponent("login", LoginComponent.class);
}
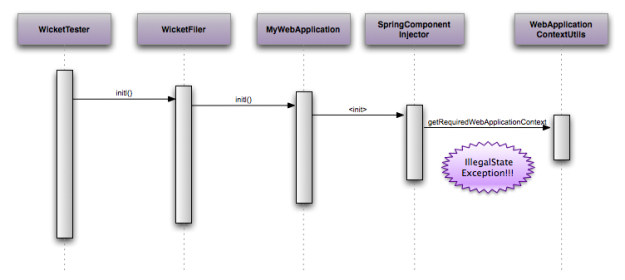
}@Autowired annotation will be automatically dependency injected as well so that you can easily access and use these for your testing purposes. Since MyWebApplication, which extends Wicket's WebApplication type and represents the main class of our web application, is also a bean within the ApplicationContext managed by Spring, it will also be provided to us by the test framework itself and can be easily used in order to initialize a WicketTester instance later on during the execution of the test's setUp() method. With this kind of simple, annotation based test configuration we are able to run an integration test that verifies whether a LoginPage gets started and initialized, whether the rendering of the page runs smoothly and whether the page itself contains a LoginComponent that we possibly need in order to process user's login successfully.When you run this test though, you'll unfortunately get the following exception raised:java.lang.IllegalStateException: No WebApplicationContext found: no ContextLoaderListener registered? at org.springframework.web.context.support.WebApplicationContextUtils.getRequiredWebApplicationContext(WebApplicationContextUtils.java:84) at org.apache.wicket.spring.injection.annot.SpringComponentInjector.<init>(SpringComponentInjector.java:72) at com.comsysto.serviceplatform.uiwebapp.MyWebApplication.initializeSpringComponentInjector(MyWebApplication.java:59) at com.comsysto.serviceplatform.uiwebapp.MyWebApplication.init(MyWebApplication.java:49) at org.apache.wicket.protocol.http.WicketFilter.init(WicketFilter.java:719) at org.apache.wicket.protocol.http.MockWebApplication.<init>(MockWebApplication.java:168) at org.apache.wicket.util.tester.BaseWicketTester.<init>(BaseWicketTester.java:219) at org.apache.wicket.util.tester.WicketTester.<init>(WicketTester.java:325) at org.apache.wicket.util.tester.WicketTester.<init>(WicketTester.java:308)
 The problem that we run against here is due to the fact that SpringComponentInjector during its own initialization is trying to get hold of an according Spring's ApplicationContext instance that would normally be there in a runtime environment but does not find any since we are running in a test environment currently. SpringComponentInjector delegates to Spring's own WebApplicationContextUtils class to retrieve the instance of ApplicationContext out of the ServletContext which is perfectly fine for a runtime environment but is unfortunately failing in a test environment:
public static WebApplicationContext getRequiredWebApplicationContext(ServletContext sc)
		throws IllegalStateException {	WebApplicationContext wac = getWebApplicationContext(sc);
	if (wac == null) {
		throw new IllegalStateException("No WebApplicationContext found: no ContextLoaderListener registered?");
	}
	return wac;
}
public SpringComponentInjector(WebApplication webapp, ApplicationContext ctx,
		boolean wrapInProxies)
{
	if (webapp == null)
	{
		throw new IllegalArgumentException("Argument [[webapp]] cannot be null");
	}	if (ctx == null)
	{
		throw new IllegalArgumentException("Argument [[ctx]] cannot be null");
	}	// store context in application's metadata …
	webapp.setMetaData(CONTEXT_KEY, new ApplicationContextHolder(ctx));	// … and create and register the annotation aware injector
	InjectorHolder.setInjector(new AnnotSpringInjector(new ContextLocator(), wrapInProxies));
}
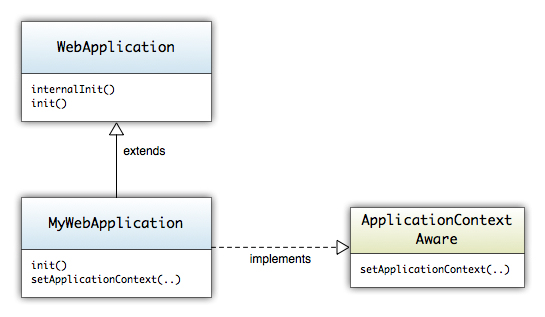
ApplicationContext instance on our own in our MyWebApplication implementation. The easiest way to do this is to use Spring's own concept of lifecycle callbacks provided to the beans managed by the Spring container. Since our MyWebApplication is also a bean managed by the Spring container at runtime (enabled by the classpath scanning and @Component annotation on a type level), we can declare it to implement ApplicationContextAware interface which ensures that it gets provided with the ApplicationContext instance that it runs in by the Spring container itself during startup.public interface ApplicationContextAware { void setApplicationContext(ApplicationContext applicationContext) throws BeansException;}
MyWebApplication type will now look something like the following code snippet:@Component public class MyWebApplication extends WebApplication implements ApplicationContextAware { @Override protected void init() { addComponentInstantiationListener(new SpringComponentInjector(this, ctx, true)); } public void setApplicationContext(ApplicationContext applicationContext) throws BeansException { this.ctx = applicationContext; } }
MyWebApplication now relates to both Wicket and Spring framework here is an according class diagram:

